This tutorial will focus on transitioning from one view to another. We will be utilizing Apple’s UINavigationController. I will be using the code from the “Hello World” tutorial that I previously wrote. So if you have not completed it yet, go ahead and do it and come back to this page. (It’s quick I promise). You can view it here.
In this tutorial you will learn:
- Add A New View
- Add A View Controller
- Set Up The Transition To The View
- Connect The View To The Code
- Add A Back Button
The first thing we are going to do is change our “Hello World” text to say something that sounds more like navigation. Go ahead and open RootViewController.m. Location the cellForRowAtIndexPath method (it’s the one that you edited to display “Hello World” in the table cell.
Change the line: [cell setText:@"Hello World"] ; to [cell setText:@"Next View"];
Add A New View
We will now add the view that we will be transitioning to. Click on RootViewController.xib and this should open up Interface Builder. We don’t actually need to edit this file. Once inside Interface Builder click on File -> New and select View.
It will add a blank View to your project. For now, we will keep it simple. Go ahead and drag a new Label on to the View. Double click on the label and change the text to whatever you want. I set mine to View 2 (I know, not very imaginative).
Let’s save the view. Click File -> Save. Call it View2. Make sure that you save it inside your Hello World project’s directory. It may want to save it somewhere else by default.
Next, you will see a screen asking you if you want to add the View to your project. Check the box next to Hello World and click Add.
Close Interface Builder. Drag the View2.xib file into the Resources folder, if it didn’t appear there by default (this will help maintain organization).
Add A View Controller
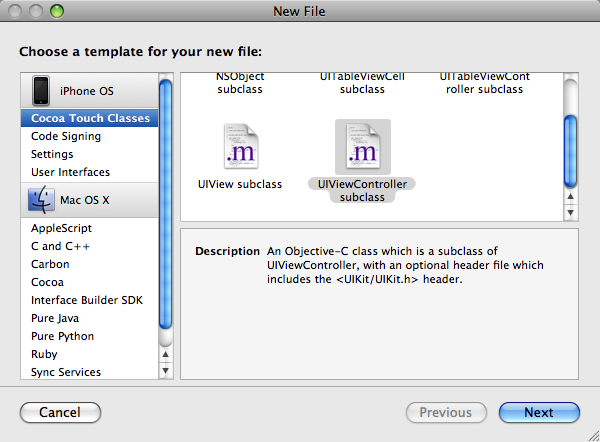
Now we need to create a ViewController class. This class will be used to connect the view that we just created to our code. Inside of Xcode click File -> New File… Select UIViewController subclass and click Next.
Name it View2ViewController and make sure “Also create “View2ViewController.h” “ is checked. Click Finish to continue. This will add the new ViewController to your project.
For organization sake, drag your View2ViewController.h and .m files into the Classes folder if they didn’t appear there to begin with.
Set Up The Transition To The New View
Open up RootViewController.h and add the following code:
This code should be pretty self explanatory, but I will explain it anyway. The import statement #import “View2ViewController.h” gets the header file of the ViewController that we created and allows us to create new instances of it.


