Custom UITableViewCell Using Interface Builder
If you're new here, you may want to subscribe to my RSS feed. Thanks for visiting!
Hey everyone, welcome to my first of many screencasts coming in the next few weeks. Today I am going to show you how to layout a UITableViewCell in Interface Builder and have a UITableView populate with those type of cells. I am adopting a new structure for my screencasts which will be 5 or so mintues of keynote slides giving background info followed by 20 – 25 mintues of step by step development. The entire video will be directly below this paragraph, but scrolling down you will see a text based step by step of the whole tutorial as well. Hope you guys enjoy.
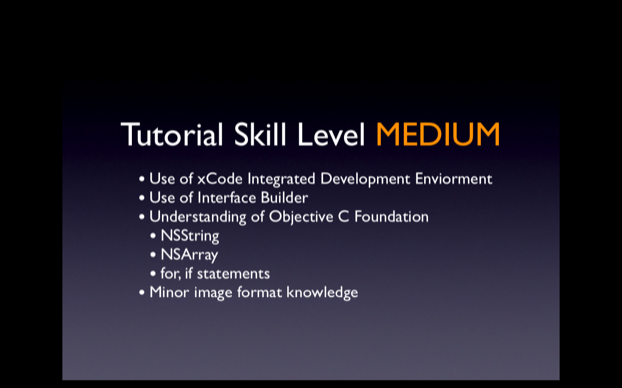
Skill Level MEDIUM
Here is a link to the screencast to watch. We are working on getting an embedded version in, but I figure this is basically just as functional. Have fun!
Source Code
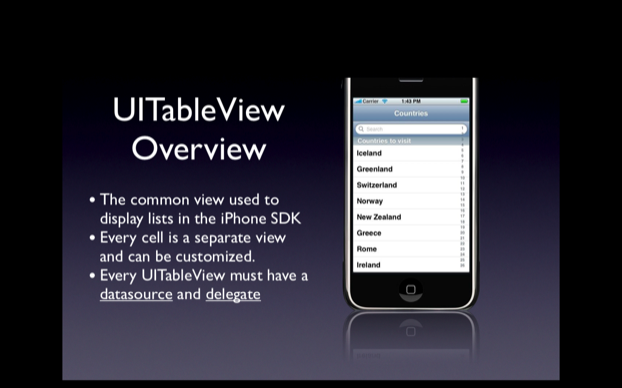
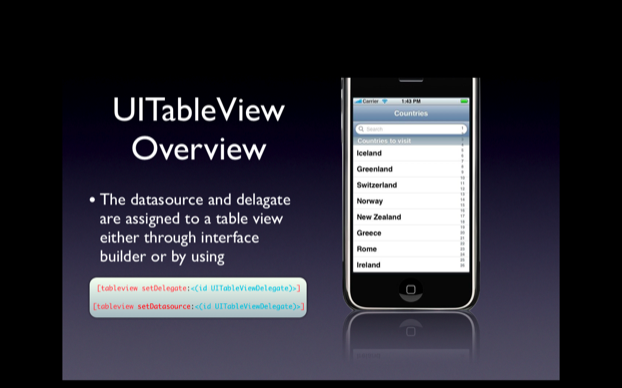
Background Information

Building The App
Step 1
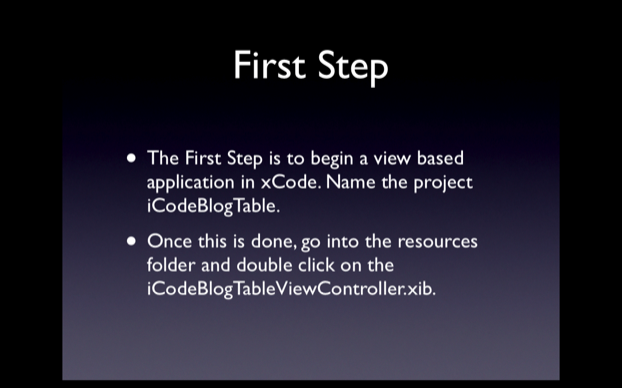
This step shouldn’t require any extra information.
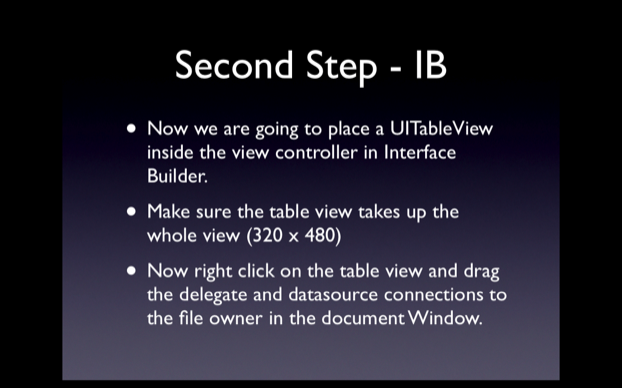
Step 2
Step 3
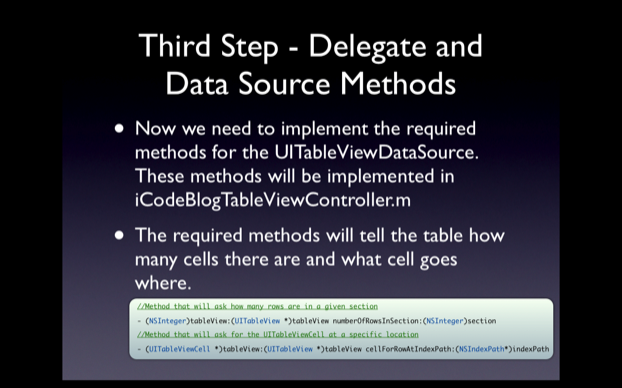
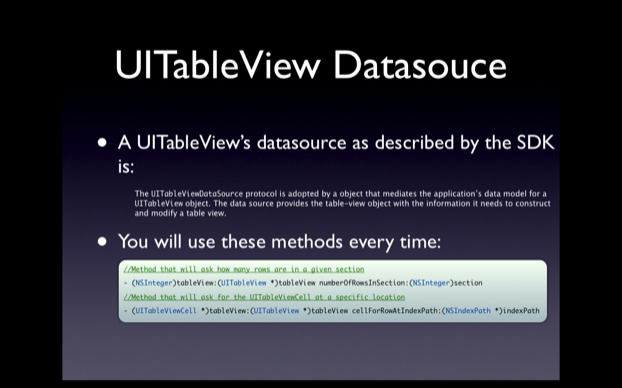
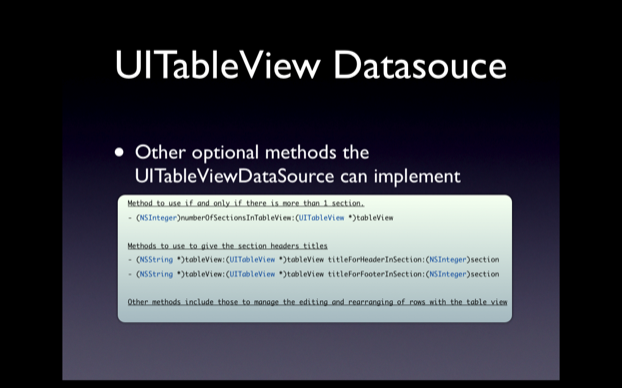
In CustomTableCellTutorialViewController.m you must define the two required UITableViewDataSource methods. These methods will fill up the table view with data. For now we will put in dummy data just to make sure all of our connections are working.
- (NSInteger)tableView:(UITableView *)tableView numberOfRowsInSection:(NSInteger)section
{
return 10;
}
- (UITableViewCell *)tableView:(UITableView *)tableView cellForRowAtIndexPath:(NSIndexPath *)indexPath
{
static NSString *CellIdentifier = @”Cell”;
UITableViewCell *cell = [tableView dequeueReusableCellWithIdentifier:CellIdentifier];
if (cell == nil){
cell = [[[UITableViewCell alloc] initWithStyle:UITableViewCellStyleDefault reuseIdentifier:CellIdentifier] autorelease];
}
[cell setText:[NSString stringWithFormat:@"I am cell %d", indexPath.row]];
return cell;
}
Step 4
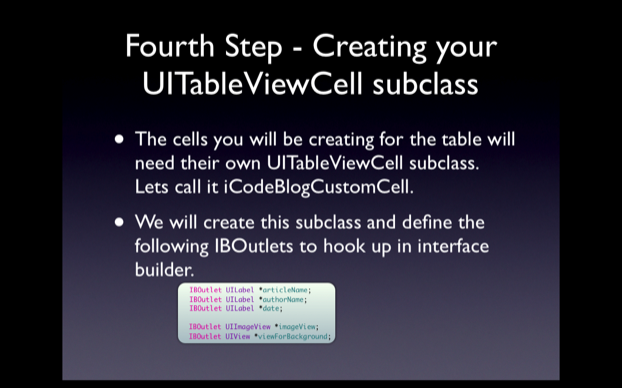
Here you will need to be in xCode and go to File -> New File…
Select Objective C Class and make sure it is a UITableViewCell subclass, depending on your version of the SDK selecting this will differ. Look around and you will find it, call it iCodeBlogCustomCell. With this done enter these IBOutlets in the iCodeBlogCustomCell.h file enter the following IBOutlets:
IBOutlet UILabel *articleName;
IBOutlet UILabel *authorName;
IBOutlet UILabel *date;
IBOutlet UIImageView *imageView;
IBOutlet UIView *viewForBackground;
Add the @property and synthesize them in the main.
Step 5
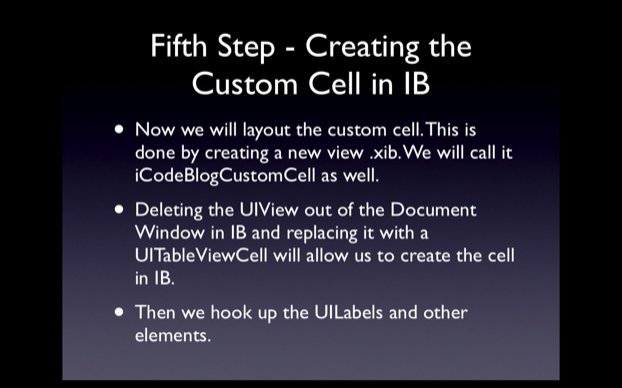
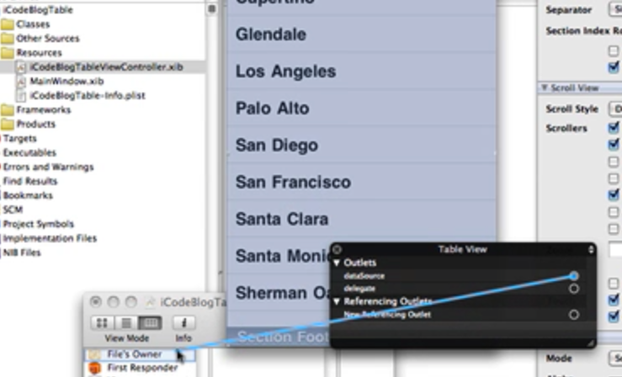
This step does not require and code but does require a lot of work in Interface Builder. I highly recommend you watch the screencast to see the step by step procedure here. Essentially what I do is create a new View XIB file. Opening this, I delete the standard UIView in the XIB and drag a UITableViewCell from my library into my document window. I assign the UITableViewCell to be of type iCodeBlogCustomCell. With this done layout the interface with the proper elements and hook them up by right clicking on the UITableViewCell in the document window.
Step 6
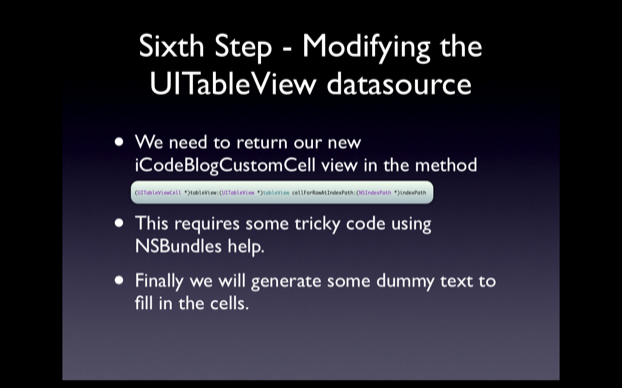
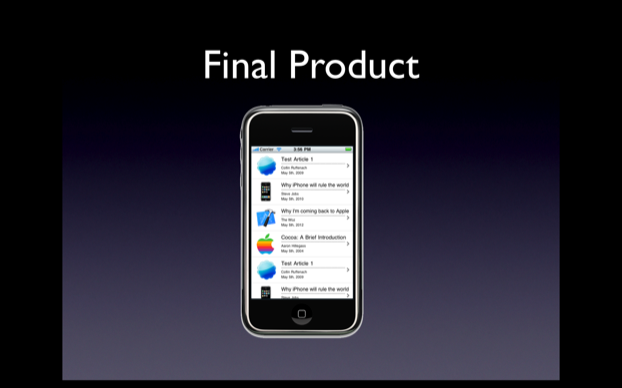
This is where the real magic is. We are going to return to CustomTableCellTutorialViewController.m and edit the UITableViewDataSource methods we implemented earlier. The code I use has me putting in 4 separate PNG files that I add to my project. You can find your own to put inside the cells. Make sure the UIImageView inside the cell is set for Aspect Fit so you don’t have to worry about resizing the images. The functions should be changed to be:
- (NSInteger)tableView:(UITableView *)tableView numberOfRowsInSection:(NSInteger)section
{
return 100;
}
- (UITableViewCell *)tableView:(UITableView *)tableView cellForRowAtIndexPath:(NSIndexPath *)indexPath
{
static NSString *CellIdentifier = @”iCodeBlogCustomCell”;
iCodeBlogCustomCell *cell = [tableView dequeueReusableCellWithIdentifier:CellIdentifier];
if (cell == nil){
NSLog(@”New Cell Made”);
NSArray *topLevelObjects = [[NSBundle mainBundle] loadNibNamed:@”iCodeBlogCustomCell” owner:nil options:nil];
for(id currentObject in topLevelObjects)
{
if([currentObject isKindOfClass:[iCodeBlogCustomCell class]])
{
cell = (iCodeBlogCustomCell *)currentObject;
break;
}
}
}
if(indexPath.row % 4 == 0)
{
[[cell authorName] setText:@”Collin Ruffenach”];
[[cell articleName] setText:@”Test Article 1″];
[[cell date] setText:@”May 5th, 2009″];
[[cell imageView] setImage:[UIImage imageNamed:@"1.png"]];
}
else if(indexPath.row % 4 == 1)
{
[[cell authorName] setText:@”Steve Jobs”];
[[cell articleName] setText:@”Why iPhone will rule the world”];
[[cell date] setText:@”May 5th, 2010″];
[[cell imageView] setImage:[UIImage imageNamed:@"2.png"]];
}
else if(indexPath.row % 4 == 2)
{
[[cell authorName] setText:@”The Woz”];
[[cell articleName] setText:@”Why I’m coming back to Apple”];
[[cell date] setText:@”May 5th, 2012″];
[[cell imageView] setImage:[UIImage imageNamed:@"3.png"]];
}
else if(indexPath.row % 4 == 3)
{
[[cell authorName] setText:@”Aaron Hillegass”];
[[cell articleName] setText:@”Cocoa: A Brief Introduction”];
[[cell date] setText:@”May 5th, 2004″];
[[cell imageView] setImage:[UIImage imageNamed:@"4.png"]];
}
return cell;
}
The End
So that is it for my first new post. I will be doing many more. Let me know your thoughts on this format in the comments. If you see anything organization wise that you think should be changed/add/removed let me know. Good Luck!
- Posted by on 24 May 2009 in Interface Builder, Uncategorized, iPhone Articles, iPhone Programming Tutorials, iphone, objective-c
- |
- |
- |
- 60 Comments »
Hello Everyone
Hi there. My name is Collin Ruffenach and I am going to be posting several new iCodeBlog Screencasts in the next few weeks. I have been an avid Apple user for the last 5 years and for the last 3 have really focused on improving my Objective C/Cocoa Skills. I am currently working on several application to be released in the store with the iPhone 3.0 software. Currently I am a Masters CS student at Arizona State University working on several iPhone development projects for varying studies around the university.
Long time readers may remember a post I did back in October of last year. I was still fairly new to the SDK then and now have the skills required to make many screencasts on varying topics and tailored to many skill levels. I am going to be implementing something new in my posts to dictate the difficulty of a screencast. With the first minute you will see an overview of the skills needed to get through the screencast. I have several in mind, including a few dealing with API’s made available within the 3.0 SDK. These lessons will be posted as soon as the NDA (Non Disclosure Agreement) is removed on the 3.0 software.
My first post will be coming in the next few days, but anyone with requests for screencast topics please post them here. I will pick some I think I can do and get them up for you guys in the next few weeks. Also if please use the commenting systems on the screencasts, I read every comment and really try to focus on any pointed out problems. Thanks, you’ll be seeing some stuff from me soon.
- Posted by on 8 May 2009 in Uncategorized
- |
- |
- |
- 12 Comments »
Loading data from .plist files
Saving and Reloading from .plist files…
A great way to store dictionary data that does not change during runtime is in a .plist file. Say you want to organize some data hierarchically or you want to store the navigation structure of a drill-down somewhere more convenient (see drill-down save example in apple docs), then a .plist file is a great way to go.
Here’s a quick example of how to restore data from a plist file. I’ll use a plist file that you can find in every app out there: Info.plist
Sometimes it’s useful to display a version number on a splash view and here’s how you can do that using the Info.plist CFBundleVersion value.
          NSString *path = [[NSBundle mainBundle] bundlePath];

          NSString *finalPath = [path stringByAppendingPathComponent:@"Info.plist"];

          NSDictionary *plistData = [[NSDictionary dictionaryWithContentsOfFile:finalPath] retain];
versionLabel = [[UILabel alloc] initWithFrame:CGRectMake(100,100,60,25)]; // for example

          versionLabel.backgroundColor = [UIColor clearColor];

          versionLabel.textColor = [UIColor whiteColor];

          versionLabel.font = [UIFont systemFontOfSize:10];

          NSString *versionString = [NSString stringWithFormat:@"v%@", [plistData objectForKey:@"CFBundleVersion"]];

          versionLabel.text = versionString;

          [self.view addSubview:versionLabel];
Now you can see pretty easily how the plist file becomes an NSDictionary object. Pretty easy no?
- Posted by on 14 Feb 2009 in Uncategorized
- |
- |
- |
- 13 Comments »
Follow Us on Twitter!
Stay tuned for the next game programming tutorial. Should be up soon…
Happy iCoding.
- Posted by on 30 Jan 2009 in Uncategorized
- |
- |
- |
- 3 Comments »
New Job… New People… More iPhone Coding Goodness
So, I have recently accepted a job with a company called . This job is a great opportunity for me as I will be writing iPhone applications for a living! Pretty sick eh?
What does this mean for iCodeBlog.com? Glad you asked. It means better tutorials. As I will be coding Objective C every day of my life, my skill set will become greater and greater. I will be able to write more in depth tutorials. Also, the team at Rightsprite is made up of many brilliant individuals. So as time goes on, you will see them posting tutorials and other resources as well.
So better content and more frequent tutorials… what’s not to love.
Also, I don’t mean to plug the company I work for too much, but I get a lot of requests for freelance work via email. I can now fulfill those requests via Rightsprite. So, if you have an iPhone application that you want developed, head on over to and contact the HR people. I will certainly be one of the developers working on your application.
So be on the look out for posts from the RightSprite team. Also, the first part in my iPhone game programming tutorial series is just about to launch. Check back really soon…
- Posted by on 15 Jan 2009 in Uncategorized
- |
- |
- |
- 11 Comments »
Animoto launch… and already Techcrunched!
Why this is so great – you no longer have to wait until you get home and to your computer to create slide shows of the amazing pictures you take at a wedding, sports event, or whatever. Make it on the fly and then email it out to friends while you’re still there. I love it.
- Posted by jonathan on 23 Dec 2008 in Uncategorized
- |
- |
- |
- No Comments »
Campaign Trail Update
In compliance with Apple’s seemingly random censorship, the Campaign Trail is finally ready for sale. After swapping out the original avatars that resemble somewhat like Obama, Mccain, Clinton, and Palin, the folks at Apple finally relented. Here are the altered and original game screenshots:
Basically, we changed out some hair and skin tones, hairstyle, accessories. But I am still floored by the fact that the application was rejected the first time around. Apple claims that I am ridiculing public figures. However, I can just as easily say that blond guy is Eminem. But Eminem is also a public figure… does it make it OK? If people can get offended by a cartoon that looks like Obama smiling, couldn’t there also be people offended by a grinning cartoon of Eminem?
The irony is that the figure in the screenshot is NOT Eminem. What I am trying to point out is that these avatars can really look like anyone you want them to. If we are not able to depiction of certain public figures in the game, then no game is safe from displaying anything that resembles human. Doesn’t it sound crazy to you? It does to me.
- Posted by on 19 Dec 2008 in Uncategorized
- |
- |
- |
- 3 Comments »
Apple woe and Apple whoa!
For the most part, I would like to believe the Apple employees in general have pretty good heads on their shoulders. If anything, you would have expected some open-mindedness from a company that claims to be dynamic and innovative in nature. Sadly, the opposite is exactly what we’ve experienced from the folks at Apple.
No one will argue that last presidential election is historically insignificant. In many different ways, the entire election campaign, from the primary to the final election result, has meant something special to most of us. In honoring this special occasion, we at RightSprite decided to create a commemorative iPhone game that is both family friendly and light-hearted.
We’ve selected one of the most popular genres — match three puzzle — and gave it an election theme. Instead of matching 3 jewels in a row, you would match 3 voters of the same face to get the points. You are able to select an avatar and you will share the same board as the computer component. Now, we are fairly cognizant of the fact that some people may feel more sensitive about the topic, so we deliberately made cartoon versions of the candidates and removed the names. We balanced gender by having 2 male and 2 female candidates. We also made sure that there are two “blue” avatars for the Democrat party and two “red” avatars for the Republican party. Finally, in lieu of catching all the election hype and try to cash in on it, we decided that we would launch the game after the election is over and make it free.
We submitted the app last week, and last night we got a courteous reject email from Apple. Why? According to Apple, our application contains “obscene, pornographic, offensive or defamatory content or materials of any kind (text, graphics, images, photographs, etc.), or other content or materials that in Apple’s reasonable judgement may be found objectionable by iPhone or iPod touch users.” To fix this issue, Apple suggested that we should “remove the caricatures of public figures from the application.”
After taking all the precautions, my initial reaction was that I found this to be exceedingly offensive. Other than the game is loosely themed politically, there isn’t an objectionable thing the application I can think of. Would it have been less of a caricature if we had used real photos? I think not. And, what if we had accessorized the candidates with glasses or mustaches? Would that have been any more respectful?
There is no doubt that the when players pick up this game, they will immediately make that association between the avatars in the game and the current events. Indeed, this is what we intended to do as the game itself is a commemorative piece. Without the avatars, the application is really nothing more than a mediocre rehash of a match three game.
Many of us have heard about and read the horror stories about submitting applications to Apple. We had up to this point been blissfully unscathed by the Apple AppPolice. Our streak has now run out and we have our own cautionary tale for other developers out there. Hopefully you’ll sense Apple’s logic in the censoring of our caricatures and be able to avoid making our mistake in your own apps. In the meantime, we’re back to the drawing board and we will keep you posted. Comments welcome.
- Posted by on 12 Dec 2008 in Uncategorized
- |
- |
- |
- 1 Comment »
iPhone: applicationDidFinishLaunching & handleOpenUrl
Problem:
You use the applicationDidFinishLaunching method to kick off your application. This event fires automatically on your delegate whenever your app launches.
If your app launches from a special url schema (tel://, http://, mailto://), then another event is fired:
handleOpenUrl
As you might have noticed in the LaunchMe sample project that ships with Xcode, these two methods will most likely conflict.
Solution:
Move the functionality from applicationDidFinishLaunching and put it in another method, like postLaunch. Then add a member variable to the application delegate to keep track of how the app started:
@interface YourAppDelegate : NSObject  {BOOL launchDefault;}

@property BOOL launchDefault;
Then put this in applicationDidFinishLaunching:
launchDefault = YES;[self performSelector:@selector(postFinishLaunch) withObject:nil afterDelay:0.0];
Then in handleOpenUrl, add this:
launchDefault = NO;
Lastly, write the postLaunch method and make it check the launchDefault variable.
- (void)postLaunch{ if (launchDefault){     // Add your functionality from applicationDidFinishLaunching here. }else{     // don't do anything....let handleOpenURL run }

}
How does this work?
You’re effectively adding a method to the event chain to be called after all other events. You’re putting a 0 second delay on it, so it shouldn’t add any extra time to the overall loading time.
- Posted by on 3 Nov 2008 in Uncategorized
- |
- |
- |
- 5 Comments »
Xcode SDK / iPhone OS Idiosyncracies
The Problem:
Recently, after upgrading an iPhone to the current iPhone development firmware Xcode was unable to detect the device. I first noticed this when trying to build directly to the device:
“no provisioned iphone os device connected”. Needless to say, the device was in fact connected.
After that, I opened the organizer and saw:
“unable to locate a suitable developer disk image…”.
The Solution:
Downloading and installing the current Xcode SDK. Wouldn’t it be helpful if the error message could tell you that?
- Posted by on 2 Nov 2008 in Uncategorized
- |
- |
- |
- No Comments »