iPhone Development: Where is all the $$$
Hey guys,
So this is the first post we are doing that is more about developers than about developing. The Guardian put up a great today talking about the app store, developers and what is driving sales. The app store has most certainly solidified itself, at least for the time being, as the most dominant mobile application distribution system; but what does the future of the “App Economy” look like?
The App Store is really unique in the tech world. There has never been anything that allows consumers and developers to have “instant” (sort of for developers) access to such a wide spread digital software storefront. The idea of a piece of software being an impulse buy didn’t really exist before the App Store, and it is interesting to study the evolution of the apps as well as the evolution of sales. Currently the big winner in app categories is games, little games especially. Got five minutes before that meeting? Pull out or maybe . But these are fleeting. As the App Store gets older, apps will need to evolve in order to keep consumers spending.
A great example of that is a sponsor of our site. allows users to send documents to people when a signature is required. This was all done through a web interface until they made their iPhone app. Now lawyers, business owners, anyone can be on the go and sign and return paperwork from anywhere. It is incredible how much time this saves compared to the traditional method of getting people to sign documents. Instead of Print, Mail, Sign, Mail Back; it is Email, Sign.
This is a great example of the internet integration that is going to be vital to most apps coming out. While the iPhone is a pretty incredible device it could never do any high level video processing or other processor intensive task. Thankfully, the internet allows the iPhone to act as a little window into whatever you would like. You can use your servers to do all the processing and send the result back to the user. Imagine it like sending an SAT test to a tutor online and just getting back the answers. There was a lot of work involved in getting the answers, but in reality all the answers is not very much data.
This is one of the real problems with many new iPhone developers. New developers will get their Objective C down perfectly and suddenly realize that their needs to be a large web based aspect to their app in order to achieve the functionality they are looking for. Most of these “web based aspects” will be simple things, like a high score board for instance. However with a well structures web/iphone architecture you could have a large amount of your app be pulled from the web, allowing you to change your app without putting out a new release on the app store. This kind of approach I think should be utilized more for even small things in apps. If the background to a game or the logo of a game changed throughout the course of a year because the images were updated online, this would add some nice personality to some apps that you think have become stagnant. While this does alienate some of the iPod Touch users, a developer could ensure a complete app packadged up requiring no internet yet still incorperate this technique.
Coming up here on iCodeBlog we will be making a full app through several screencasts that we will put in the app store. Right now we are thinking of a small game, but we will make sure to include at lease one web based service within the app. Anyways, make sure to check out the . Great stuff. Thanks for reading and happy coding!
- Posted by on 29 Jul 2009 in Uncategorized
- |
- |
- |
- 10 Comments »
Getting Images From The iPhone Photo Library Or Camera Using UIImagePickerController
This will be a simple tutorial showing you how to access the iPhone’s photo library as well as the camera. Since the 3.0 update, the methods for picking photos have been . So this will be a 3.0 and above tutorial.
We will be creating an applicaiton that will allow you to pick a photo from the library or camera and display it on the screen. Here is a screenshot of what the app will look like:

Let’s go ahead and get started…
1. Create A New View Based Application
I called mine photoApp (I will be using this name as reference)
2. Create The IBOutlets and IBAction
Open photoAppViewController.h and add the following code
#import

@interface PhotoAppViewController : UIViewController | UIImagePickerControllerDelegate, UINavigationControllerDelegate | {
        UIImageView * imageView;
        UIButton * choosePhotoBtn;
        UIButton * takePhotoBtn;
}

@property (nonatomic, retain) IBOutlet UIImageView * imageView;
@property (nonatomic, retain) IBOutlet UIButton * choosePhotoBtn;
@property (nonatomic, retain) IBOutlet UIButton * takePhotoBtn;

-(IBAction) getPhoto:(id) sender;

@end
Important: Replace the | in the interface declaration with < and >. I just used the vertical pipe bc wordpress was replacing it with html encoding.
Notice that we implement the UIImagePickerControlDelegate and the UINavigationControllerDelegate. These are both needed to properly interface with the image picker. The rest of this stuff should be pretty strait forward if you have been reading our tutorials. We set up some outlets to the buttons we are using (this will be to determine which button was pressed). There is also and IBAction that will get called when the user presses either of the buttons. This method (getPhoto) will show the ImagePicker.
3. Create The Interface
Open up photoAppViewController.xib in Interface builder and follow these steps:
- Drag a UIImageView on to the main view
- Set the Mode of the UIImageView to Aspect Fit in the Attribute inspector
- Drag a UIButton on to the view and title it Choose Photo
- Drag another UIButton on to the view and title it Take Photo
The interface should look something like this:

4. Connect The IBoutlets and IBAction
- Connect choosePhotoBtn to the UIButton titled Choose Photo
- Connect takePhotoBtn to the UIButton titled Take Photo
- Connect the imageView to the UIImageView
- Connect the Touch Up Inside callback on each of the buttons to the getPhoto method
When you click on File’s Owner the connection inspector should look like this:

Close Interface Builder
5. Implement The getPhoto Method
Open PhotoAppViewController.m and add the following code:
@synthesize imageView,choosePhotoBtn, takePhotoBtn;

-(IBAction) getPhoto:(id) sender {
        UIImagePickerController * picker = [[UIImagePickerController alloc] init];
        picker.delegate = self;

        if((UIButton *) sender == choosePhotoBtn) {
                picker.sourceType = UIImagePickerControllerSourceTypeSavedPhotosAlbum;
        } else {
                picker.sourceType = UIImagePickerControllerSourceTypeCamera;
        }

        [self presentModalViewController:picker animated:YES];
}
Make sure you synthesize your view properties. Here is what is going on in this method.
We first create a new UIImagePickerController object. This is a view controller and can be displayed any way you would normally display a view controller (pop on to a navigation view stack, load in a tab view, present as modalviewcontroller). Next, we set the delegate of the picker to our viewController. This just means the picker will call a method inside of this class when the user picks a photo.
Next, we determine which button was pressed. Since both buttons were connected to this method, we can see which one called it by using ==. Now, here is where Apple has done a great job. The difference between displaying the camera and photo library comes from setting a single property in the picker. Looking at the code, it should be pretty obvious which is which.
Finally, we call presentModalViewController with our picker. This will animate the picker into view from the bottom of the screen to the top. Depending on the button you press, you should see one of the views below:


6. Displaying The Selected Image
Once a photo is selected or taken, the ImagePicker will callback to a method in our class called didFinishPickingMediaWithInfo. Add the following code to your PhotoAppViewController.m file.
- (void)imagePickerController:(UIImagePickerController *)picker didFinishPickingMediaWithInfo:(NSDictionary *)info {
        [picker dismissModalViewControllerAnimated:YES];
        imageView.image = [info objectForKey:@"UIImagePickerControllerOriginalImage"];
}
The first line just hides the picker. The next sets to image property of our image view to an image returned from the picker. The picker actually returns an NSDictionary. That is because the other key ; will return whether this is a video or an image.
And there you have it. A way to get photos from the iPhone’s image library or camera. If you have any comments or questions, feel free to write them in the comments section of this post or . You can download the source below. Happy iCoding!
iPhone Tutorial – PhotoApp.zip
- Posted by on 28 Jul 2009 in Uncategorized
- |
- |
- |
- 28 Comments »
Programmatically Getting a Screencapture of any UIView
Introduction
Hey guys. This post is in response to a comment made in my last post about NSTimers. Techy asked if we could do a post on how to take screenshots programmatically using the iPhone SDK. For this minor project we will be creating a small web browser application that will start at www.google.com, and have a button on a toolbar at the bottom to take a picture of the web view and save it into you photo library. Lets take a look.

Source
You can get the source here: Screenshot Project
Steps
Step 1
Create a view based application in xCode. Call it whatever.
Step 2
In the header for your view controller declare the following:
#import

@interface ScreenCaptureViewController : UIViewController
{
        IBOutlet UIWebView *webview;
}

@property (nonatomic, retain) IBOutlet UIWebView *webview;

-(IBAction)captureScreen:(id)sender;

@end
Step 3
Open up your view controller’s XIB file.
- Drag in a UIToolbar and put it at the bottom of the screen.
- Drag in a UIToolbarButtom and name it appropriately.
- Drag in a flexible space holder on either side of the button to center it.
- Drag in a UIWebView to take up the rest of the screen above the toolbar.
- Connect the UIWebView to our webview IBOutlet.
- Connect out UIToolbarButton to our IBAction catureScreen:(id)sender.
Step 4
Uncomment out the viewDidLoad method and use the following code:
- (void)viewDidLoad
{
    [super viewDidLoad];

    [webview loadRequest:[NSURLRequest requestWithURL:[NSURL URLWithString:@"http://www.google.com"]]];
}
Step 5
All the is left to do is create the IBAction captureScreen. This is the code for the method, place it in the main file for your view controller.
-(IBAction)captureScreen:(id)sender
{
        UIGraphicsBeginImageContext(webview.frame.size);
        [self.view.layer renderInContext:UIGraphicsGetCurrentContext()];
        UIImage *viewImage = UIGraphicsGetImageFromCurrentImageContext();
        UIGraphicsEndImageContext();
        UIImageWriteToSavedPhotosAlbum(viewImage, nil, nil, nil);
}
Conclusion
So that is it. You can use this general code to take a screenshot of any UIView subclass. All you need to do is replace webview.frame.size in the third line with foobar.frame.size where foobar is any UIView subclass. Hope this answered your question Techy. Happy Coding.
- Posted by on 27 Jul 2009 in Uncategorized
- |
- |
- |
- 8 Comments »
NSTimer: The Poor Man’s Threading – Code Snapshot
Introduction
Hey guys. So usually the posts we put up here involve screencasts and presentations, but we are going to start also posting small less time consuming pieces for the site. Today I bring to you a small project involving NSTimers. Today we are going to build an app that represents a horse race. We will create a view with 6 small UIView squares with a blue background at the bottom of the screen, we will use a timer to move a random one of them forward a random amount of distance. Let’s get started!

Source
You can get the source here: NSTimerDemo
Steps
Step 1
Create a view based application in xCode. Call it whatever.
Step 2
In your view controller class header file add:
NSTimer *myTimer;
Step 3
In your view controller class, uncomment out the viewDidLoad method and fill in the following code:
- (void)viewDidLoad
{
      [super viewDidLoad];

      CGRect workingFrame;
      workingFrame.origin.x = 15;
      workingFrame.origin.y = 400;
      workingFrame.size.width = 40;
      workingFrame.size.height = 40;

      for(int i = 0; i < 6; i++)
      {
           UIView *myView = [[UIView alloc] initWithFrame:workingFrame];
           [myView setTag:i];
           [myView setBackgroundColor:[UIColor blueColor]];

           workingFrame.origin.x = workingFrame.origin.x + workingFrame.size.width + 10;
           [self.view addSubview:myView];
      }

      myTimer = [NSTimer scheduledTimerWithTimeInterval:.1 target:self selector:@selector(moveACar) userInfo:nil repeats:YES];
  }
Step 4
In your view controller class, add the following method:
-(void)moveACar
{
      int r = rand() % 6;
      NSLog(@"My number is %d", r);

      for(UIView *aView in [self.view subviews])
      {
           if([aView tag] == r)
           {
                int movement = rand() % 100;
                CGRect workingFrame = aView.frame;
                workingFrame.origin.y = workingFrame.origin.y - movement;

                [UIView beginAnimations:nil context:NULL];
                [UIView setAnimationDuration:.2];
                [aView setFrame:workingFrame];
                [UIView commitAnimations];

                if(workingFrame.origin.y < 0)
                {
                    [myTimer invalidate];
                }
           }
      }
}
Conclusion
So that is it. Timers are really cool and come in handy for all sorts of small problems in a project. Happy coding.
- Posted by on 23 Jul 2009 in Code Snippets, Uncategorized
- |
- |
- |
- 21 Comments »
Site Up Host Moved
Today we experienced a server outage at our hosting provider. We were unable to get a clear idea of a time for resolution and decided it was best to move hosts to a scalable cloud-based service that can grow with our increasing traffic.
Thank you to everyone for your patience. We’ve almost completed our migration–just waiting on our assets to upload which include our very large screencast files. Please give us a few more hours and then report anything odd you see in the comments here.
- Posted by jonathan on 15 Jul 2009 in Uncategorized
- |
- |
- |
- 5 Comments »
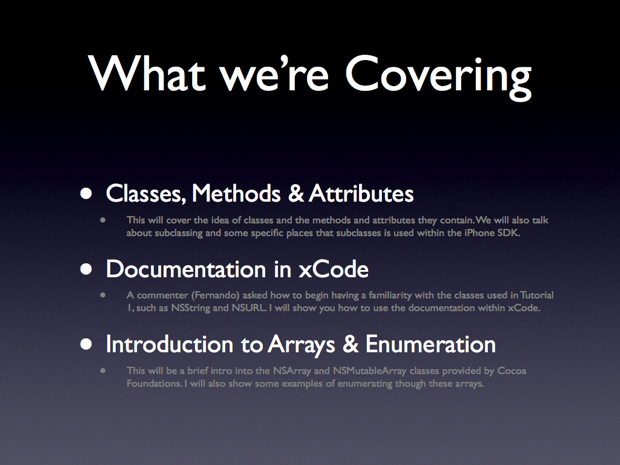
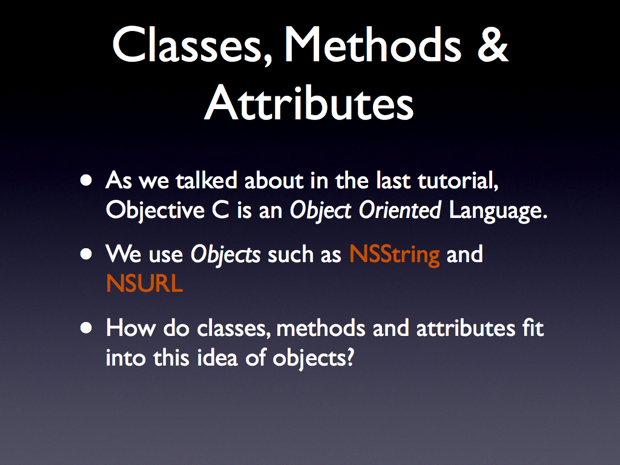
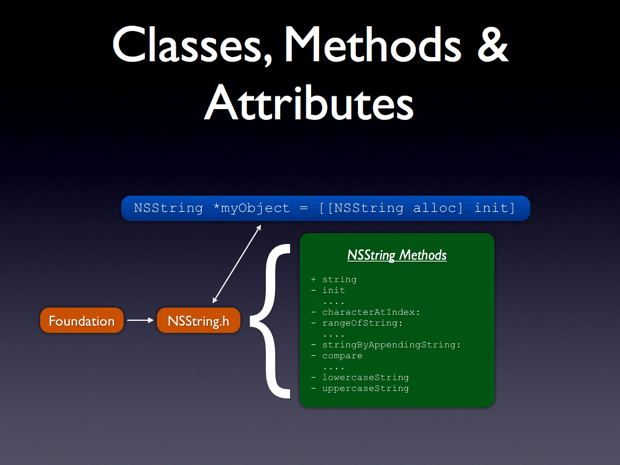
Objective C 2.0: An Intro – Part 2
Introduction
Hello everyone, welcome to my fourth screeencast. This is the second in my series introducing readers to Objective C. Let’s dive in.
Skill Level Beginner
Source Code
Screencast
I film myself coding out the entire sample project for each post. I personally think going through the Screencast is the best way to learn. But feel free to look through the slides and text if that suites you better.
from on .
Tutorial


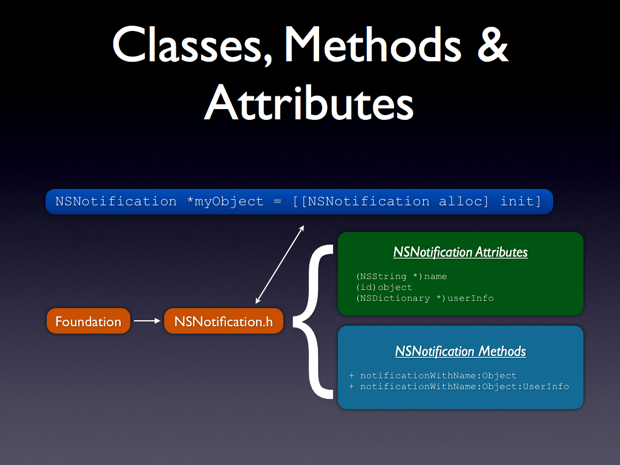

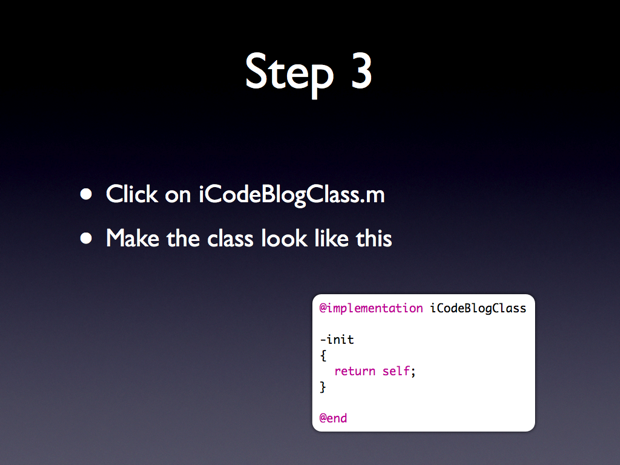
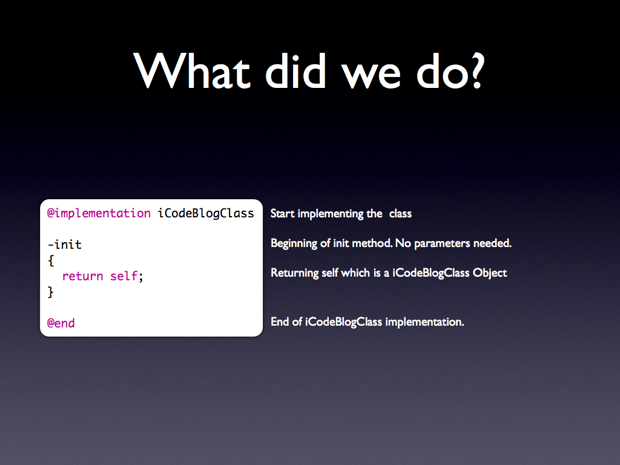
iCodeBlogClass.m:
@implementation iCodeBlogClass
@synthesize name;
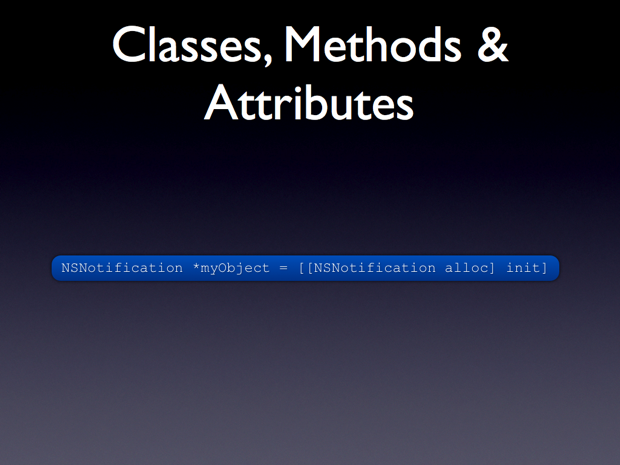
-init
{
return self;
}
@end


iCodeBlogGetsClassy.h:
#import "iCodeBlogClass.h"
iCodeBlogGetsClassy.h:
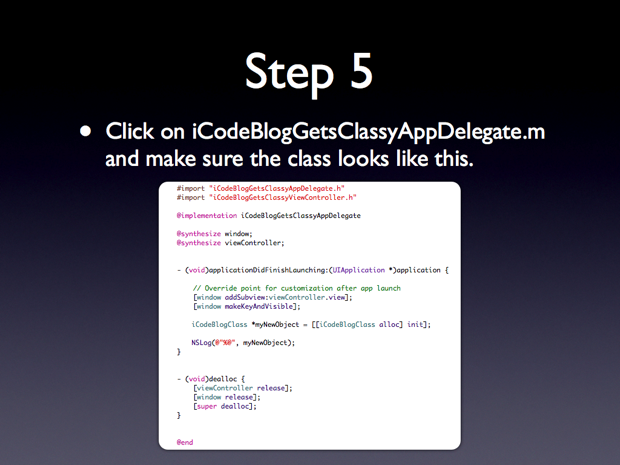
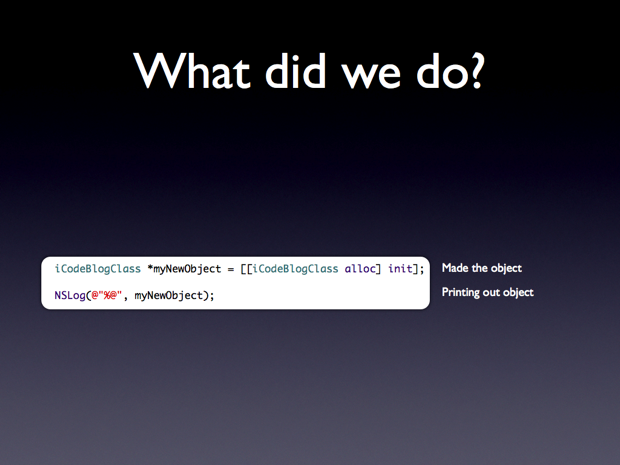
iCodeBlogClass *myNewObject = [[iCodeBlogClass alloc] init];
NSLog(@"%@", myNewObject);


iCodeBlogClass.h:
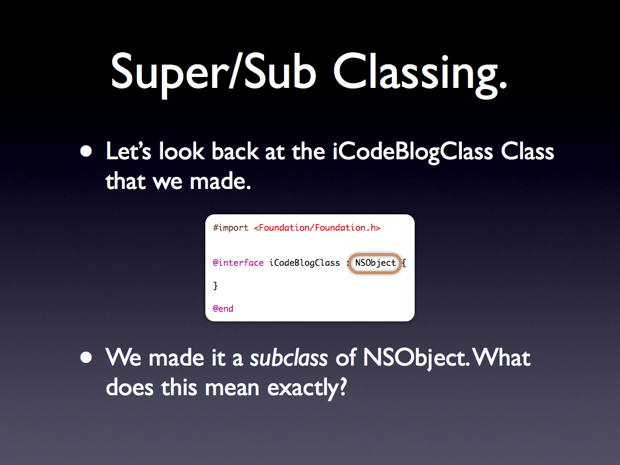
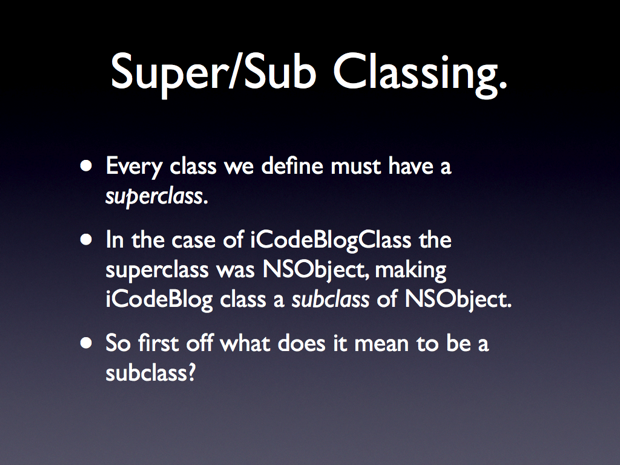
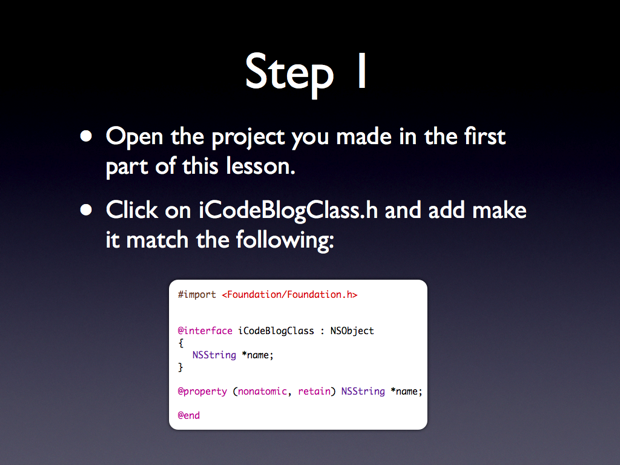
#import <Foundation/Foundation.h>

@interface iCodeBlogClass : NSObject
{
        NSString *name;
}

@property (nonatomic, retain) NSString *name;

@end
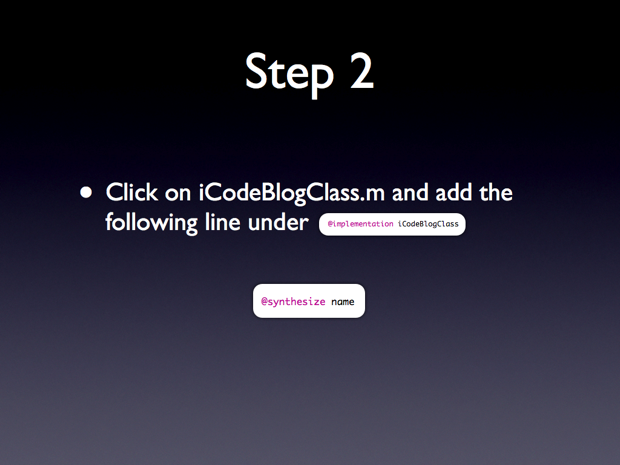
iCodeBlogClass.m:
@synthesize name;

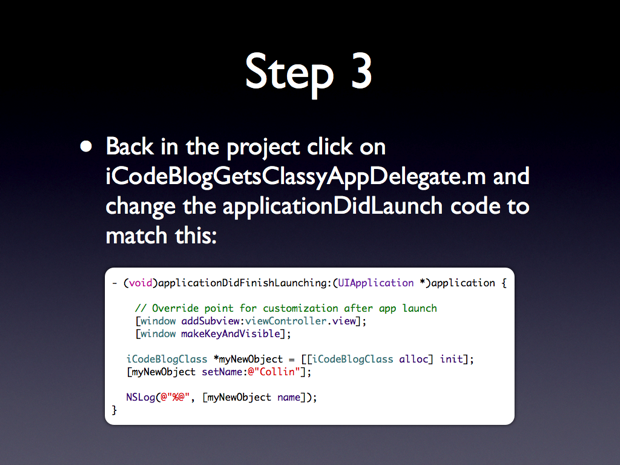
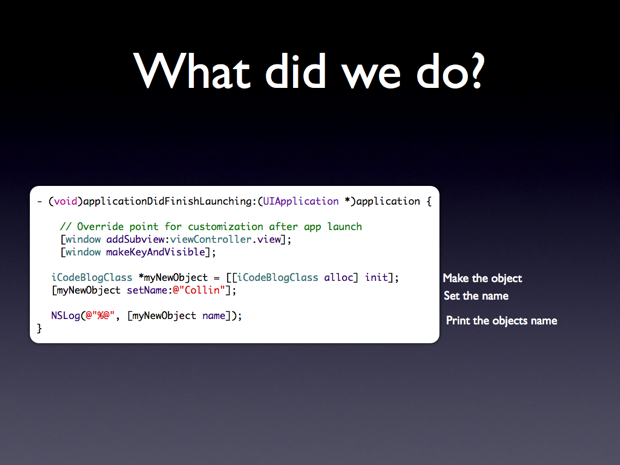
iCodeBlogGetsClassy.m:
iCodeBlogClass *myNewObject = [[iCodeBlogClass alloc] init];
[myNewObject setName:@"Collin"];

NSLog(@"%@", [myNewObject name]);
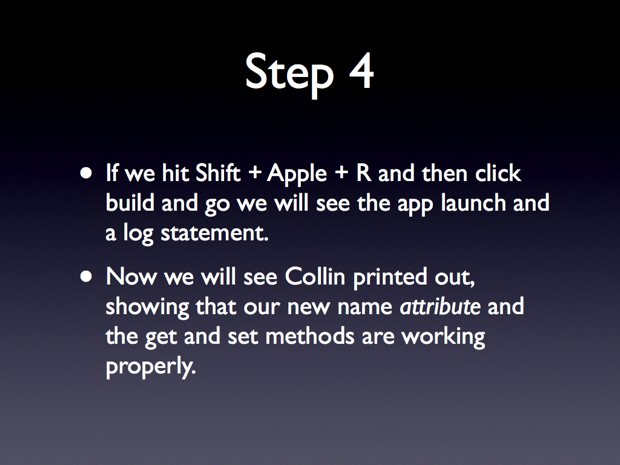
iCodeBlogClass.m:
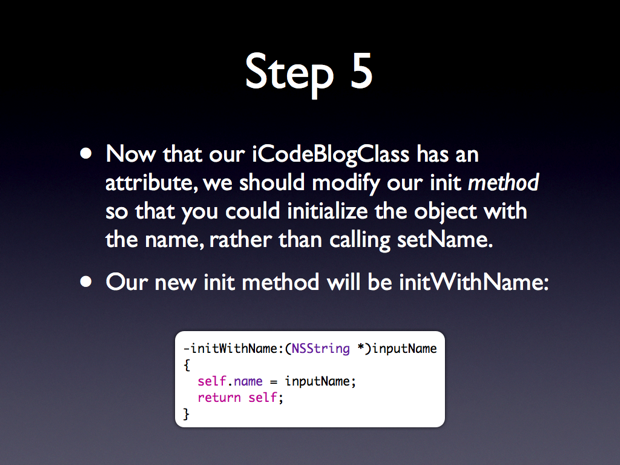
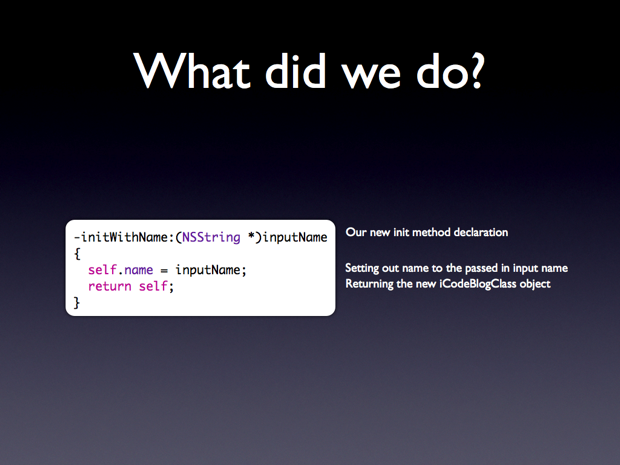
-initWithName:(NSString *)inputName
{
     self.name = inputName;
     return self;
}
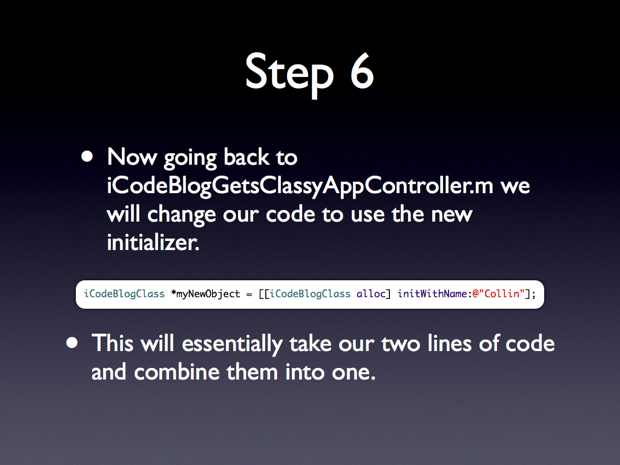
iCodeBlogGetsClassy.m:
iCodeBlogClass *myNewObject = [[iCodeBlogClass alloc] initWithName:@"Collin"];


iCodeBlogGetsClassy.m:
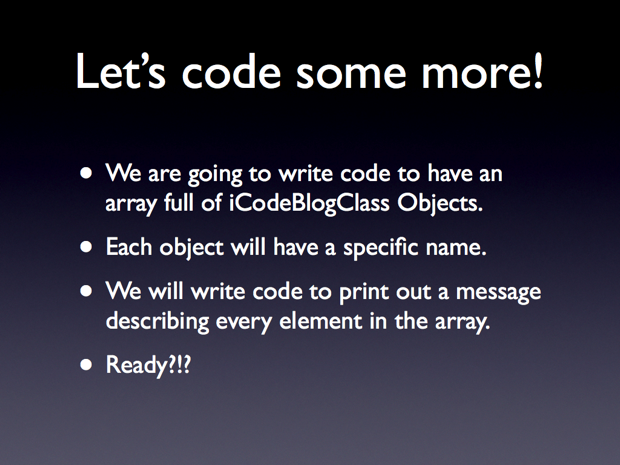
iCodeBlogClass *person1 = [[iCodeBlogClass alloc] initWithName:@"Collin"];
iCodeBlogGetsClassy.m:
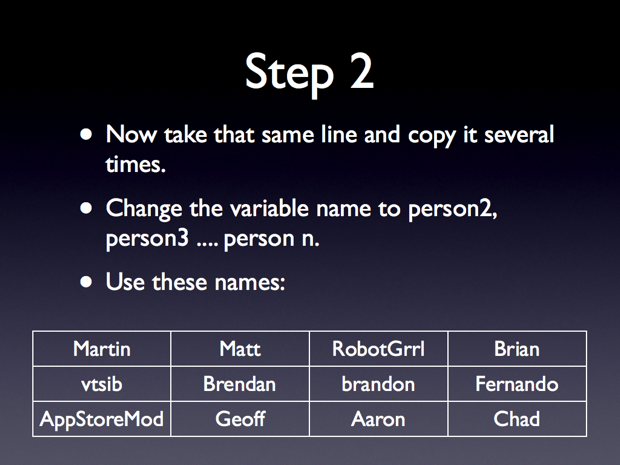
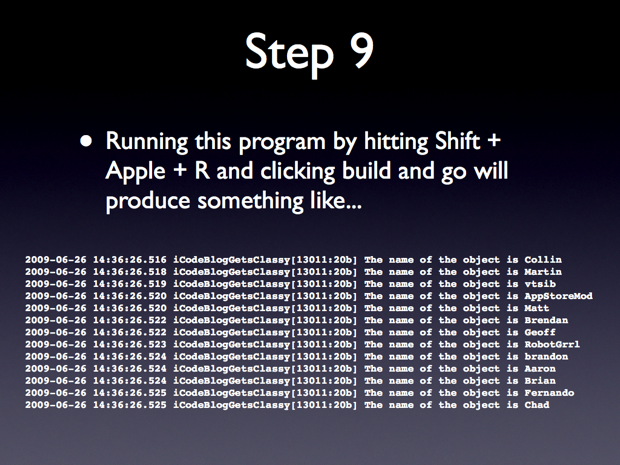
       iCodeBlogClass *person1 = [[iCodeBlogClass alloc] initWithName:@"Collin"];
        iCodeBlogClass *person2 = [[iCodeBlogClass alloc] initWithName:@"Martin"];
        iCodeBlogClass *person3 = [[iCodeBlogClass alloc] initWithName:@"vtsib"];
        iCodeBlogClass *person4 = [[iCodeBlogClass alloc] initWithName:@"AppStoreMod"];
        iCodeBlogClass *person5 = [[iCodeBlogClass alloc] initWithName:@"Matt"];
        iCodeBlogClass *person6 = [[iCodeBlogClass alloc] initWithName:@"Brendan"];
        iCodeBlogClass *person7 = [[iCodeBlogClass alloc] initWithName:@"Geoff"];
        iCodeBlogClass *person8 = [[iCodeBlogClass alloc] initWithName:@"RobotGrrl"];
        iCodeBlogClass *person9 = [[iCodeBlogClass alloc] initWithName:@"brandon"];
        iCodeBlogClass *person10 = [[iCodeBlogClass alloc] initWithName:@"Aaron"];
        iCodeBlogClass *person11 = [[iCodeBlogClass alloc] initWithName:@"Brian"];
        iCodeBlogClass *person12 = [[iCodeBlogClass alloc] initWithName:@"Fernando"];
        iCodeBlogClass *person13 = [[iCodeBlogClass alloc] initWithName:@"Chad"];
iCodeBlogGetsClassy.m:
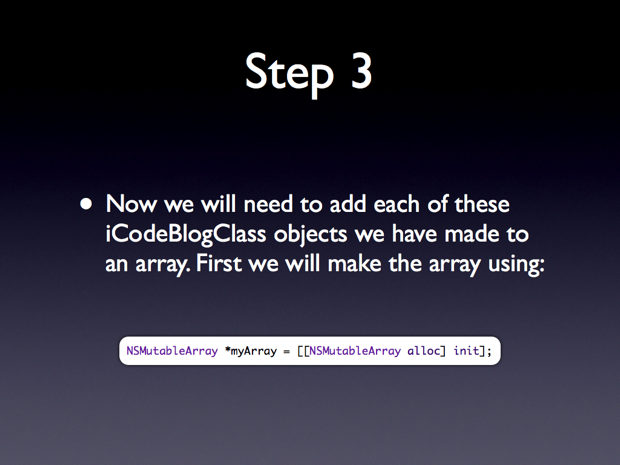
NSMutableArray *myArray = [[NSMutableArray alloc] init];
iCodeBlogGetsClassy.m:
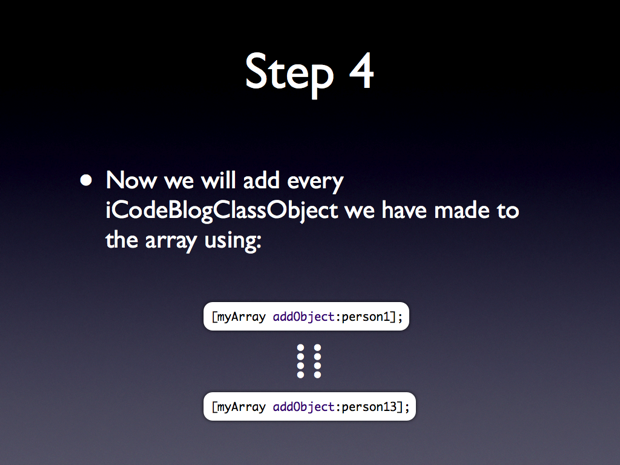
       [myArray addObject:person1];
        [myArray addObject:person2];
        [myArray addObject:person3];
        [myArray addObject:person4];
        [myArray addObject:person5];
        [myArray addObject:person6];
        [myArray addObject:person7];
        [myArray addObject:person8];
        [myArray addObject:person9];
        [myArray addObject:person10];
        [myArray addObject:person11];
        [myArray addObject:person12];
        [myArray addObject:person13];
iCodeBlogGetsClassy.m:
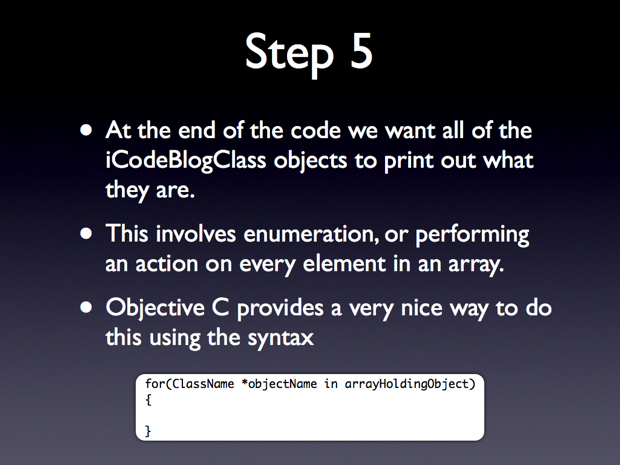
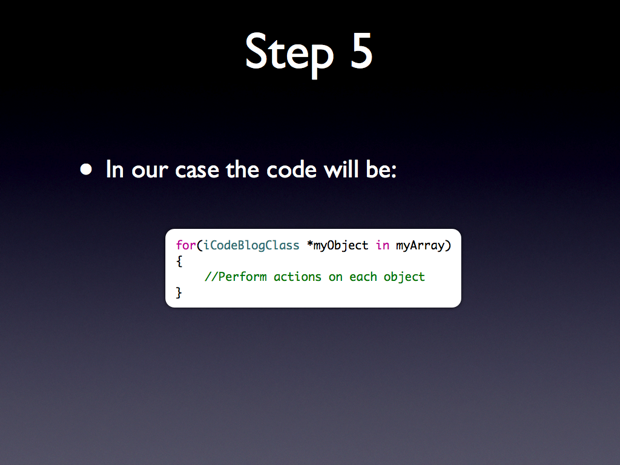
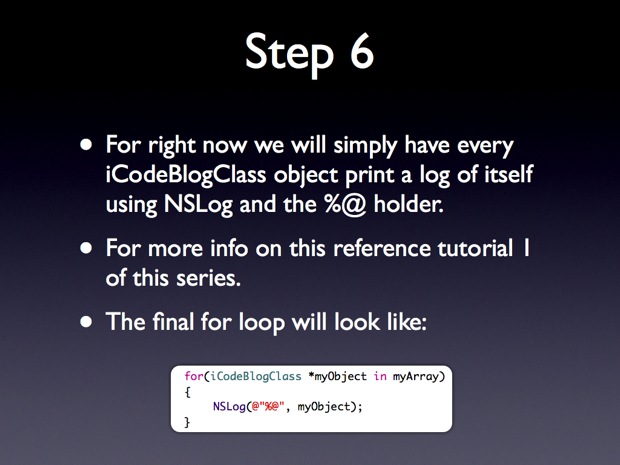
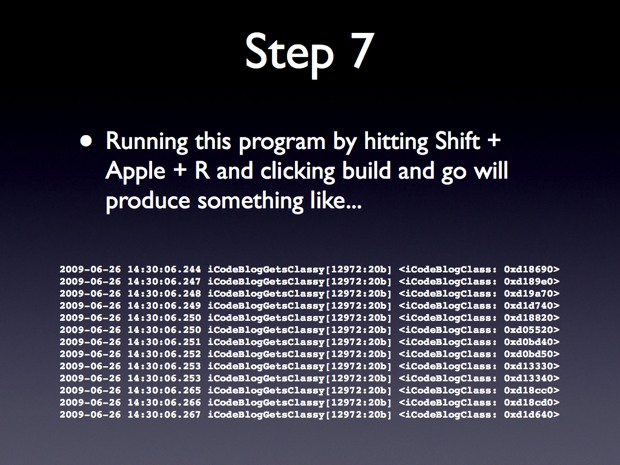
       for(iCodeBlogClass *myObject in myArray)
        {
                NSLog(@"%@", myObject);
        }
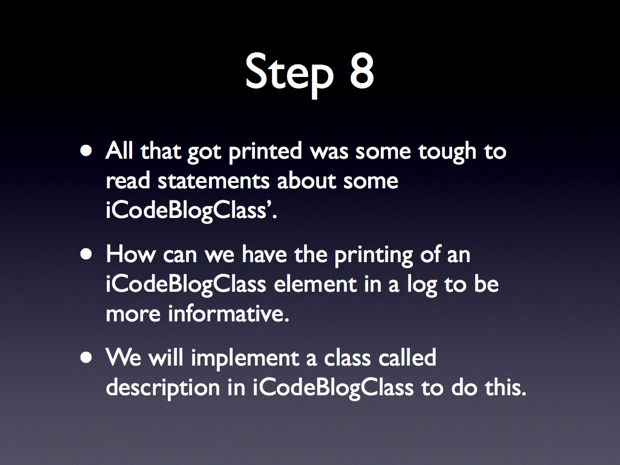
iCodeBlogGetsClassy.m:
-(NSString *)description
{
        return [NSString stringWithFormat:@"The name of the object is %@", self.name];
}
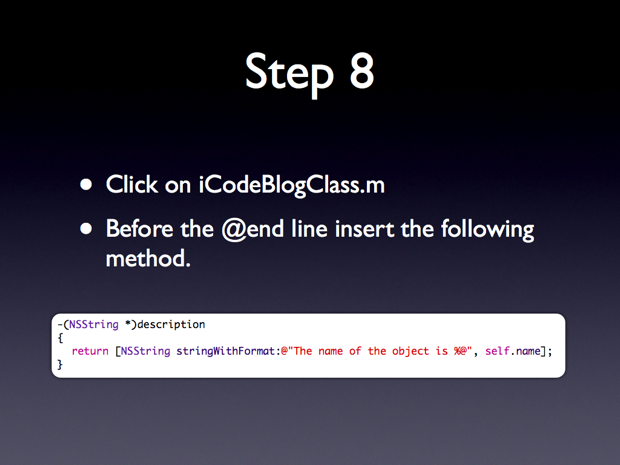
- Posted by on 29 Jun 2009 in Uncategorized
- |
- |
- |
- 22 Comments »
Using NSXMLParser to Pull UIImages From the Web
Introduction
Hello everyone, welcome to my third screeencast. This screencast is the result of a request made in the comments of my first post. I am going to be covering many topics in this post. But the general idea of the app we will build is that it will use an XML file online to get the URL and title of a given picture. For each URL and Title pair a view will be created with a UIImageView showing the image and a UILabel showing the title. Each of these views will be placed in a UIScrollView to flip through, like th functinoality of the Photos app.
Skill Level Medium
This app is going to require a decent amount of experience with Objective C and xCode. Also some minimal understanding of XML and XML schema/structure would be valuable.
Source Code
Available Here
Screencast
I film myself coding out the entire sample project for each post. I personally think going through the Screencast is the best way to learn. But feel free to look through the slides and text if that suites you better.
from on .
SCREENCAST ADDITION
Adding a final line to layoutSubviews should be:
     [scrollview setFrame:workingFrame];

this will stop the scroll view from bouncing up and down.
Tutorial


iCodeBlogXMLImagesViewController.h:
@interface iCodeBlogXMLImagesViewController : UIViewController
{
        IBOutlet UIScrollView *scrollview;
}

@property (nonatomic, retain) IBOutlet UIScrollView *scrollview;
iCodeBlogXMLImagesViewController.m
@synthesize scrollview;


iCodeBlogXMLView.h:
@interface iCodeBlogXMLView : UIView
{
        IBOutlet UIImageView *imageView;
        IBOutlet UILabel *title;
}

@property (nonatomic, retain) IBOutlet UIImageView *imageView;
@property (nonatomic, retain) IBOutlet UILabel *title;

@end
iCodeBlogXMLView.m
@synthesize imageView;
@synthesize title;


iCodeBlogXMLElement.h:
@interface iCodeBlogXMLElement : NSObject
{
        UIImage *image;
        NSString *imageTitle;
}

@property (nonatomic, retain) UIImage *image;
@property (nonatomic, retain) NSString *imageTitle;

@end
iCodeBlogXMLElement.m
@synthesize image;
@synthesize imageTitle;


iCodeBlogXMLImagesViewController.h:
#import <UIKit/UIKit.h>
#import "iCodeBlogXMLElement.h"
#import "iCodeBlogXMLView.h"

@interface iCodeBlogXMLImagesViewController : UIViewController
{
        IBOutlet UIScrollView *scrollview;

        NSXMLParser *parser;
        NSMutableString *currentAttribute;
        NSMutableArray *xmlElementObjects;

        iCodeBlogXMLElement *tempElement;
}

@property (nonatomic, retain) IBOutlet UIScrollView *scrollview;

@property (nonatomic, retain) NSXMLParser *parser;
@property (nonatomic, retain) NSMutableString *currentAttribute;
@property (nonatomic, retain) NSMutableArray *xmlElementObjects;

@property (nonatomic, retain) iCodeBlogXMLElement *tempElement;

-(void)layoutSubview;

@end
iCodeBlogXMLImagesViewController.m
@implementation iCodeBlogXMLImagesViewController

@synthesize scrollview;
@synthesize parser;
@synthesize currentAttribute;
@synthesize xmlElementObjects;
@synthesize tempElement;

...

- (void)viewDidLoad
{
    [super viewDidLoad];

        xmlElementObjects = [[NSMutableArray alloc] init];

        parser = [[NSXMLParser alloc] initWithContentsOfURL:[NSURL URLWithString:@"http://losectrl-gaincommand.com/iCodeBlogHelper/Tutorial3/iCodeBlogImageXML.xml"]];
        [parser setDelegate:self];
        [parser parse];
}

...

- (void)parser:(NSXMLParser *)parser didStartElement:(NSString *)elementName namespaceURI:(NSString *)namespaceURI qualifiedName:(NSString *)qName attributes:(NSDictionary *)attributeDict
{

}

- (void)parser:(NSXMLParser *)parser didEndElement:(NSString *)elementName namespaceURI:(NSString *)namespaceURI qualifiedName:(NSString *)qName
{

}

- (void)parser:(NSXMLParser *)parser foundCharacters:(NSString *)string
{

}


iCodeBlogXMLImagesViewController.m
- (void)parser:(NSXMLParser *)parser didStartElement:(NSString *)elementName namespaceURI:(NSString *)namespaceURI qualifiedName:(NSString *)qName attributes:(NSDictionary *)attributeDict
{
        if(![elementName compare:@"PictureInfo"])
        {
                tempElement = [[iCodeBlogXMLElement alloc] init];
        }

        else if(![elementName compare:@"imageURL"])
        {
                currentAttribute = [NSMutableString string];
        }

        else if(![elementName compare:@"imageTitle"])
        {
                currentAttribute = [NSMutableString string];
        }
}

- (void)parser:(NSXMLParser *)parser didEndElement:(NSString *)elementName namespaceURI:(NSString *)namespaceURI qualifiedName:(NSString *)qName
{
        if(![elementName compare:@"PictureInfo"])
        {
                [xmlElementObjects addObject:tempElement];
        }

        else if(![elementName compare:@"imageURL"])
        {
                NSURL *imageURL = [NSURL URLWithString:currentAttribute];
                NSData *data =  [NSData dataWithContentsOfURL:imageURL];
                UIImage *image = [[UIImage alloc] initWithData:data];

                [tempElement setImage:image];
        }

        else if(![elementName compare:@"imageTitle"])
        {
                NSLog(@"The image title is %@", currentAttribute);
                [tempElement setImageTitle:currentAttribute];
        }

        else if(![elementName compare:@"Pictures"])
        {
                [self layoutSubview];
        }
}

- (void)parser:(NSXMLParser *)parser foundCharacters:(NSString *)string
{
        if(self.currentAttribute)
        {
                [self.currentAttribute appendString:string];
        }
}

iCodeBlogXMLImagesViewController.m
-(void)layoutSubview
{
        CGRect workingFrame;

        workingFrame.origin.x = 0;
        workingFrame.origin.y = 0;
        workingFrame.size.height = 480;
        workingFrame.size.width = 320;

        iCodeBlogXMLView *myView;

        for(iCodeBlogXMLElement *element in [self xmlElementObjects])
        {
                myView = [[iCodeBlogXMLView alloc] initWithFrame:workingFrame];

                NSLog(@"Element title is: %@", [element imageTitle]);

                NSArray *topLeveObjects = [[NSBundle mainBundle] loadNibNamed:@"iCodeBlogXMLView" owner:nil options:nil];

                for(id currentObject in topLeveObjects)
                {
                        if([currentObject isKindOfClass:[iCodeBlogXMLView class]])
                        {
                                myView = (iCodeBlogXMLView *)currentObject;
                        }
                }

                [[myView imageView] setImage:[element image]];
                [[myView title] setText:[element imageTitle]];
                [myView setFrame:workingFrame];

                [scrollview addSubview:myView];

                workingFrame.origin.x = workingFrame.origin.x + 320;
        }

        workingFrame.size.width = workingFrame.origin.x;
        [scrollview setContentSize:workingFrame.size];

        workingFrame.origin.x = 0;
        workingFrame.origin.y = 0;
        workingFrame.size.width = 320;
        workingFrame.size.height = 480;
}

iCodeBlogXMLImagesViewController.m
parser = [[NSXMLParser alloc] initWithContentsOfURL:[NSURL URLWithString:@"http://losectrl-gaincommand.com/iCodeBlogHelper/Tutorial3/iCodeBlogImageXMLB.xml"]];
- Posted by on 19 Jun 2009 in Interface Builder, Uncategorized, objective-c
- |
- |
- |
- 35 Comments »
Objective C 2.0: An Intro – Part 1
Introduction
Hello everyone, welcome to my second screeencast. This is going to be the first in a series of screencasts that are focused at people just beginning to work with Objective C and Cocoa. For many reasons the beginnings of learning cocoa development can be frusterating and lonely to a point. Only now is Objective C and Cocoa development gaining the kind of momentum to drive the creation of resources such as iCodeBlog and others.
Skill Level Beginner
This is not going to be a tutorial for someone who has never had any experience with programming. I aviod getting into the Object Oriented Methodology side of things. All you will need to know for this tutorail is generally the purpose of Classes, Methods and Objects. If you have done any work with Java, C, C++ or C# you should be able to follow the content no problem.
Screencast
I film myself coding out the entire sample project for each post. I personally think going through the Screencast is the best way to learn. But feel free to look through the slides and text if that suites you better.
Tutorial


Instructions
- Open xCode
- File -> New Project
- Start a new View based iPhone Project. The type of project you create really doesn’t matter for this exercise since we will only be programming a for loop to print and not creating any User Interface.
- Call the project iCodeBlogCounter
-
After saving the project you will be confronted with a screen looking something like this.

-
If you look in the top left hand corner you will see a folder called Classes. If you click the little black triangle to the left of the folder you will see what is included in the classes folder. In there you should see a class called iCodeBlogCounterAppDelegate.m. This is the file we will be working with. Click on it and you will see its contents appear in the editor window.

- We will be working with the – (void)applicationDidFinishLaunching:(UIApplication *)application method. This method is called when the application finished launching. We will be entering some very simple code that will simple count from 0 to 99 and print the numbers in the terminal window. Here is what the method should look like:

The code here is:
for(int i = 0; i < 100; i++) { NSLog(@"The current number is: %d", i); } - That is all we need to do for this app. Now time to see it in action. To bring up the terminal window hit SHIFT + APPLE + R, this should bring up a blank window with maybe a line of text in it. Now click Build and Run or hit Apple + R. The terminal windows should say “The current number is 0″ all the way to “The current is 99″. Here is a screenshot of my window.


Instructions
- Open xCode
- File -> New Project
- Start a new View based iPhone Project. The type of project you create really doesn’t matter for this exercise since we will only be programming a for loop to print and not creating any User Interface.
- Call the project iCodeBlogGetURLText
- Once the project is open go into the iCodeBlogURLTextAppDelegate.m file.
-
Add this code to the - (void)applicationDidFinishLaunching:(UIApplication *)application method
NSString *myURLString = @"http://losectrl-gaincommand.com/iCodeBlogHelper/Tutorial2/iCodeBlog.txt"; NSURL *myURL = [NSURL URLWithString:myURLString]; NSString *myString = [[NSString alloc] stringWithContentsofURL:myURL]; NSLog(@"The string from the internet is: %@", myString); - If you bring up the terminal window and Build and Run the App. You should see:


Instructions
- Go back to the code we just wrote.
-
Erase the 4 lines of code we wrote and replace it with this line:
NSLog(@"The string from the internet is: %@", [[NSString alloc] initWithContentsOfURL:[NSURL URLWithString:@"http://losectrl-gaincommand.com/iCodeBlogHelper/Tutorial2/iCodeBlog.txt"]]); - Running the application again should have the same output.
- Here is a a breakdown of out new line of code.


- Posted by on 18 Jun 2009 in Uncategorized, iphone
- |
- |
- |
- 46 Comments »
iCodeBlog Vote: What Are Some New Tutorials You Would Like To See
It’s voting time again on iCodeBlog. We have learned quite a bit about programming for the iPhone over the last year or so and would love to share that knowledge with you. I was trying to think of my next tutorial to post and then I had a thought to let the readers decide.
I know you guys are all in the middle of the next iFart project and just need a little guidance on something to finish it up. Well, now you have your chance to get advice on what you want to learn. Let us know what type of tutorial you would like to see appear on iCodeBlog by voting below. In addition to casting your vote, leave you suggestion in the comments section of this post.
After some time (few days or so), I will look at the votes as well as the comments and come up with some new tutorials based on them. I already have a guess as to what will win, but this ought to be fun! Happy voting!
- Posted by on 15 Jun 2009 in Uncategorized
- |
- |
- |
- 39 Comments »
Custom UITableViewCell Using Interface Builder
Hey everyone, welcome to my first of many screencasts coming in the next few weeks. Today I am going to show you how to layout a UITableViewCell in Interface Builder and have a UITableView populate with those type of cells. I am adopting a new structure for my screencasts which will be 5 or so mintues of keynote slides giving background info followed by 20 – 25 mintues of step by step development. The entire video will be directly below this paragraph, but scrolling down you will see a text based step by step of the whole tutorial as well. Hope you guys enjoy.
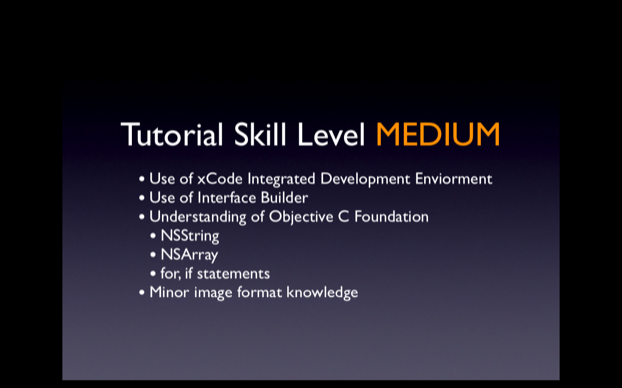
Skill Level MEDIUM
Here is a link to the screencast to watch. We are working on getting an embedded version in, but I figure this is basically just as functional. Have fun!
Source Code
Background Information

Building The App
Step 1
This step shouldn’t require any extra information.
Step 2
Step 3
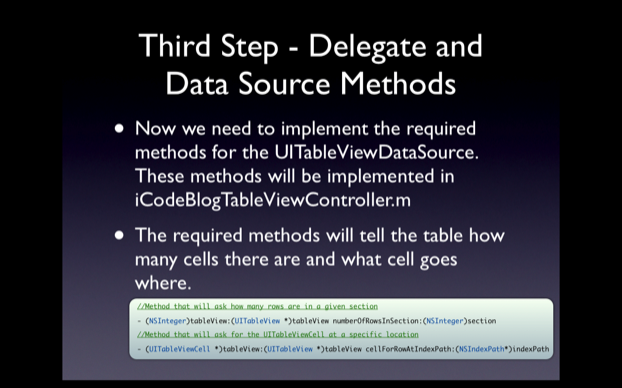
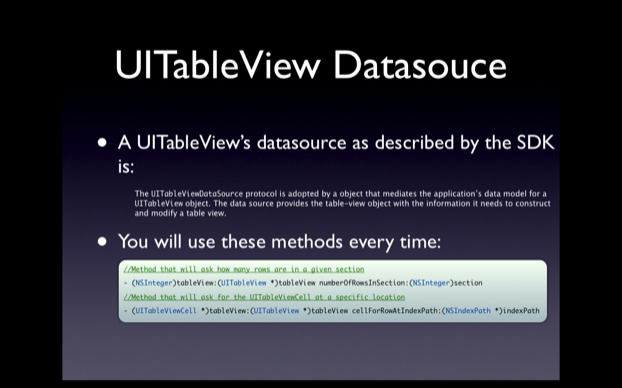
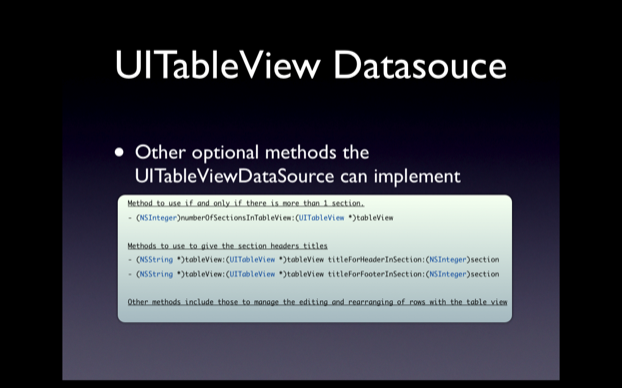
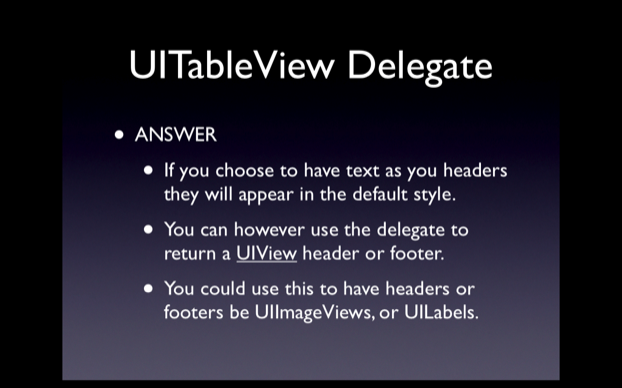
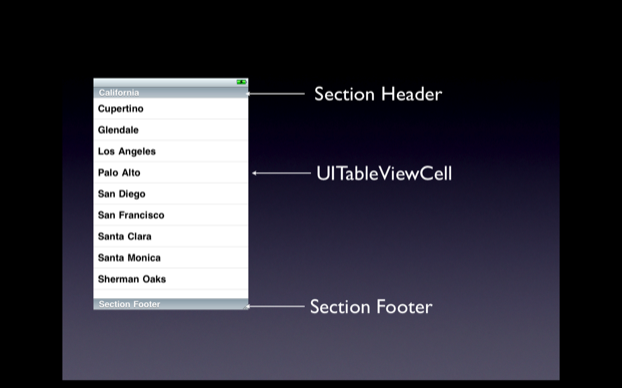
In CustomTableCellTutorialViewController.m you must define the two required UITableViewDataSource methods. These methods will fill up the table view with data. For now we will put in dummy data just to make sure all of our connections are working.
- (NSInteger)tableView:(UITableView *)tableView numberOfRowsInSection:(NSInteger)section
{
return 10;
}
- (UITableViewCell *)tableView:(UITableView *)tableView cellForRowAtIndexPath:(NSIndexPath *)indexPath
{
static NSString *CellIdentifier = @”Cell”;
UITableViewCell *cell = [tableView dequeueReusableCellWithIdentifier:CellIdentifier];
if (cell == nil){
cell = [[[UITableViewCell alloc] initWithStyle:UITableViewCellStyleDefault reuseIdentifier:CellIdentifier] autorelease];
}
[cell setText:[NSString stringWithFormat:@"I am cell %d", indexPath.row]];
return cell;
}
Step 4
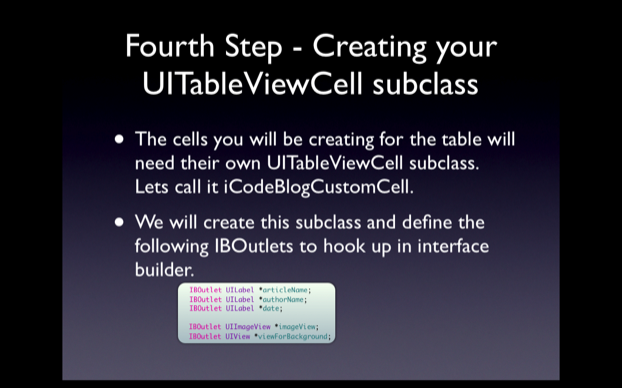
Here you will need to be in xCode and go to File -> New File…
Select Objective C Class and make sure it is a UITableViewCell subclass, depending on your version of the SDK selecting this will differ. Look around and you will find it, call it iCodeBlogCustomCell. With this done enter these IBOutlets in the iCodeBlogCustomCell.h file enter the following IBOutlets:
IBOutlet UILabel *articleName;
IBOutlet UILabel *authorName;
IBOutlet UILabel *date;
IBOutlet UIImageView *imageView;
IBOutlet UIView *viewForBackground;
Add the @property and synthesize them in the main.
Step 5
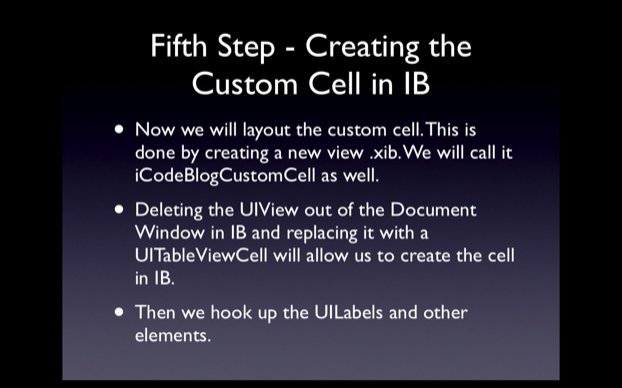
This step does not require and code but does require a lot of work in Interface Builder. I highly recommend you watch the screencast to see the step by step procedure here. Essentially what I do is create a new View XIB file. Opening this, I delete the standard UIView in the XIB and drag a UITableViewCell from my library into my document window. I assign the UITableViewCell to be of type iCodeBlogCustomCell. With this done layout the interface with the proper elements and hook them up by right clicking on the UITableViewCell in the document window.
Step 6
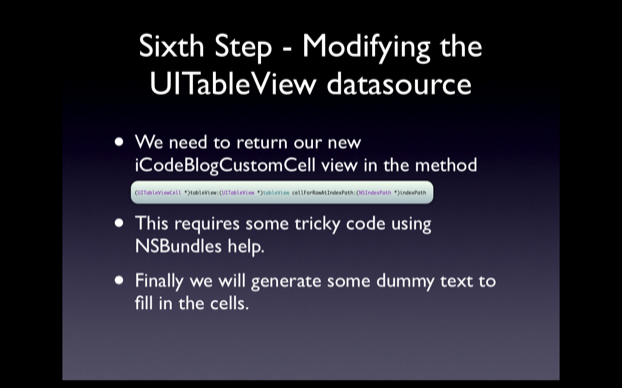
This is where the real magic is. We are going to return to CustomTableCellTutorialViewController.m and edit the UITableViewDataSource methods we implemented earlier. The code I use has me putting in 4 separate PNG files that I add to my project. You can find your own to put inside the cells. Make sure the UIImageView inside the cell is set for Aspect Fit so you don’t have to worry about resizing the images. The functions should be changed to be:
- (NSInteger)tableView:(UITableView *)tableView numberOfRowsInSection:(NSInteger)section
{
return 100;
}
- (UITableViewCell *)tableView:(UITableView *)tableView cellForRowAtIndexPath:(NSIndexPath *)indexPath
{
static NSString *CellIdentifier = @”iCodeBlogCustomCell”;
iCodeBlogCustomCell *cell = [tableView dequeueReusableCellWithIdentifier:CellIdentifier];
if (cell == nil){
NSLog(@”New Cell Made”);
NSArray *topLevelObjects = [[NSBundle mainBundle] loadNibNamed:@”iCodeBlogCustomCell” owner:nil options:nil];
for(id currentObject in topLevelObjects)
{
if([currentObject isKindOfClass:[iCodeBlogCustomCell class]])
{
cell = (iCodeBlogCustomCell *)currentObject;
break;
}
}
}
if(indexPath.row % 4 == 0)
{
[[cell authorName] setText:@”Collin Ruffenach”];
[[cell articleName] setText:@”Test Article 1″];
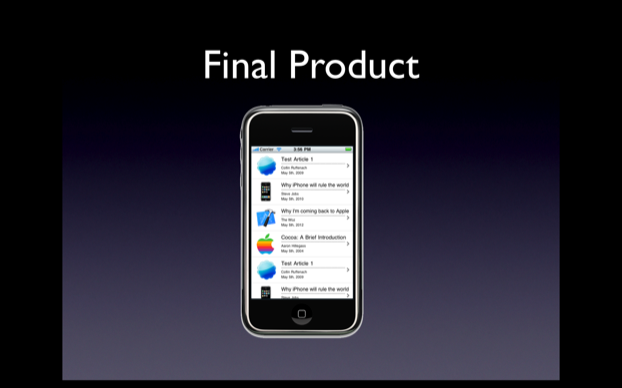
[[cell date] setText:@”May 5th, 2009″];
[[cell imageView] setImage:[UIImage imageNamed:@"1.png"]];
}
else if(indexPath.row % 4 == 1)
{
[[cell authorName] setText:@”Steve Jobs”];
[[cell articleName] setText:@”Why iPhone will rule the world”];
[[cell date] setText:@”May 5th, 2010″];
[[cell imageView] setImage:[UIImage imageNamed:@"2.png"]];
}
else if(indexPath.row % 4 == 2)
{
[[cell authorName] setText:@”The Woz”];
[[cell articleName] setText:@”Why I’m coming back to Apple”];
[[cell date] setText:@”May 5th, 2012″];
[[cell imageView] setImage:[UIImage imageNamed:@"3.png"]];
}
else if(indexPath.row % 4 == 3)
{
[[cell authorName] setText:@”Aaron Hillegass”];
[[cell articleName] setText:@”Cocoa: A Brief Introduction”];
[[cell date] setText:@”May 5th, 2004″];
[[cell imageView] setImage:[UIImage imageNamed:@"4.png"]];
}
return cell;
}
The End
So that is it for my first new post. I will be doing many more. Let me know your thoughts on this format in the comments. If you see anything organization wise that you think should be changed/add/removed let me know. Good Luck!
- Posted by on 24 May 2009 in Interface Builder, Uncategorized, iPhone Articles, iPhone Programming Tutorials, iphone, objective-c
- |
- |
- |
- 60 Comments »